skip to main |
skip to sidebar
Lighting has always been a good way to vastly improve a space without spending a huge amount of money...even with expensive fixtures, i.e. you get the greatest bang for your buck with good lighting.
 The first fixture I knew was going in was this reproduction sputnik light I'd purchased years prior from Practical Props, a dealer/manufacturer in North Hollywood that largely rents period lighting fixtures to film and television productions.
 What I had not intended was for Practical Props to custom design some sputnik sconces for my foyer and outside my bedroom door (seen below). I'd initially intended to use some brushed aluminium "double cone" or "bowtie" sconces, but these sconces protruded too far from the wall and would prove problematic near a doorway. The sputnik sconces were the most flush, mid-century appropriate fixtures I could find and Practical Props customized the length of the "tentacles" to the low heights of my ceilings...and all this for less than the cone sconces.
 Sconce outside bedroom / bathroom doorway. Even at a relatively flush six-and-a-half inches, this fixture still is frequently disturbed and prodded by passing shoulders and arms.
 I'd always wanted a George Nelson saucer lamp. This "criss-cross" model is in the dining room.
 If you recall from my post entitled "Idiots," I needed to solve a problem created by recessed lighting installed without cans or any fire-barrier into an A/C ducting soffit. These lighting fixtures called "Beauty Spots" by WAC Lighting were a good solution. They're technically recessed fixtures as the housings are not visible, yet the bulb is not recessed and instead is covered with a flush-mount, glass cube for decorative purposes. With these fixtures, I can utilize the space for lighting without worrying the heat of a light bulb will ignite the ducting insulation.
 Close-up of "ice cube" attachment around 20 watt, xenon bulb.
 View of dining room from the living room showing the sputnik light above the wetbar on the left, the sputnik sconce in the foyer, the Nelson saucer lamp in the dining room and the beauty spots on the far right.
 I found this fixture at the Habitat-for-Humanity ReStore in Pasedena. It was painted black, had several drips of white exterior paint on it, a broken porcelain socket and badly rusted brass hardware. I'd always intended for a chrome "bullet" fixture to be installed above the stone veneered fireplace, but I assumed I'd pay $225 for an "Aloha" fixture from Rejuvenation. I ended up spending $5 for this fixture at the ReStore, an additional $5 in rewiring supplies from Home Depot and $25 to have the fixture stripped and polished by Astro Chrome and Polishing. I painted the brass hardware with a can of matte silver spray paint I already had. Not bad for a total cost of around $35.
 I'd narrowed down my flooring choice to four different colors of Forbo Marmoluem (natural linoleum), before ultimately deciding on sample #1 (Mist Grey 3032) because it's light and closely resembles concrete (which is the surface surrounding samples #1 and #2).
Renteria Flooring begins the installation by cleaning and grinding the existing subfloor before applying several skim coats of Ardex Feather Finish engineered cement over the entire subfloor. This work moves along at an astonishing pace.

 Completed skim coats of Ardex in both bedroom and bathroom. Notice the completed, tiled tub-surround. Tile is Brio opaque glass tile from ModWalls. Color is "Windy City" blend.
 Sanding the Ardex skim coat to ensure no trowel marks will "telegraph" through the linoleum.
 Completed and sanded Ardex skim coat of entire square footage.

 Installation of cork underlayment. It's true what they say about cork having a pungent, not necessarily pleasant odor.
 Rolls of uninstalled linoleum. Linoleum is susceptible to a natural process called "ambering" that occurs as the linseed oil within the linoleum oxidizes. When linoleum is not exposed to light, the linseed oil causes the flooring to turn yellow. With darker or more pronounced colors, it is not noticeable, but with light greys, blues, beiges or cream colors, it is very noticeable.
 Comparison of fully oxidized sample placed upon newly unwrapped, unoxidized roll. The yellowing effect causes the flooring to appear a sickly green. I call it "pus grey." Luckily, this only lasted a week and the flooring is now just grey. As the flooring continues to oxidize over the years, it will become tougher and less susceptible to "ambering."

 Renteria Flooring installing the linoleum and deciding how to handle the seams.
 Completed linoleum installation in the bathroom. The ambering present in the linoleum really causes the flooring to look green compared to the grey tub surround tile.

 Completed linoleum installation. The crew at Renteria Flooring are real professionals. The seams are virtually imperceptible and the whole job was finished under schedule. Linoluem is such an attractive product that, aside from the maintenance requirements, I don't know why it fell from favor with American consumers. My guess is that vinyl floors came along and were much cheaper...because linoleum isn't necessarily inexpensive.
Electrical work has been completed and involved removing a myriad of fixtures installed with Romex wire (which violates code), deleting several junction boxes both accessible and hidden within the drywall (which violates code), installing recessed lighting in the kitchen and relocating low-voltage HVAC junction boxes to accommodate the foyer wall removal. Keith Flores Electric completed the work and his prices are very competitive.
I've contracted with Able Restoration to handle all drywall repair, painting, tiling, trimwork (door casing and baseboards) and masonry for the fireplace. Able Restoration completed an amazing rehabilitation of my parents' home a few years ago after the home suffered extreme water damage from a broken toilet. Able Restoration specializes in the repair of smoke, water, fire or structural damage, but they also do an excellent job for simple remodeling. If you're in Southern California (Los Angeles down to San Diego, including Orange County and San Bernardino County) and need a general contractor, drop Rick Gosliga at Able Restoration a line.
 The fireplace surround constructed of drywall was gutted during demolition, the recessed lighting and extraneous wiring removed during electrical and now the metal flashing is being removed and the surface prepped for mortar adhesion.
 Cultured Stone veneer manufactured by Owens Corning. The Product is Pro-Fit Ledgestone, Southwest Blend (PF-8019). I regret this choice. I selected this material from the website without viewing a sample and found out it was much more tan than white. For a truly mid-century look, I should've chosen Cobblefield, Austin (CSV-2035) and used a dark mortar.
 For some reason, there's a myriad of apartments and condominiums in Los Angeles built in the 1960's and 1970's with secondary entry doors into the kitchen. No one ever uses these doors and they only serve to cheat the resident out of viable cabinet space. Knowing the HOA would not grant me permission to remove this door, I simply removed all door hardware, filled knob and deadlock bores with hole covers, screwed the door shut using pocket holes and drywalled over the door interior. From the exterior, nothing has changed (expect for the lack of doorknobs) and from the interior there's no evidence of a door. The above wall is the door freshly drywalled over.
 Completed mortar bed prior to tiling.
 Excised foyer wall reframed with drywall and primer. The floor still bears evidence of the wall's original dimensions.
 Primer coat and ongoing drywall repair.
 The stone veneer on the fireplace is 90% completed. Unfortunately, one box of stone veneer was from a different dye lot and has a markedly different color than the rest. This is very noticeable in the upper third of the fireplace. The different dye lot is much brighter, contrasty and pink than the rest.
 Weeks later, I stained the discolored portions to match the rest with a tint kit supplied by the manufacturer. Subsequently, I washed the entire fireplace with a similar stain including titanium white to even the appearance out and duplicate UV fading and lime present on real, weathered stone. The result is a more subtle and natural look.
May 21st of 2009 felt like December 31st of 1989 because, in a way, it was the end of the 1980's all over again. GAS Demolition impressively performed the work and hauled away all debris in one day. No more geometric architectural details, no more glass block, and no more white, fake saltillo tile with inch thick grout. The homeowner's association has granted approval for renovations, so let the work begin!
 Foyer wall removed. I've decided to leave the electrical panel where it is. Only the low-voltage HVAC relay panel on the far right will be relocated.
Durham's Water Putty: I never bother with spackle or pre-mixed patching compound. Water putty is easy to mix (I suggest mixing in an old Tupperware container you don't mind ruining) and I've never found a product that dries as hard and remains as stable. I even use it to patch wood, i.e. fill unwanted mortises in door jambs and gouges in window sills. If you're just repairing drywall, Fixall (aka Fix-It-All) works really well too.
Gorilla Glue: Need to repair something that will ultimately be painted? Gorilla Glue is your best bet. It's much stronger than standard PVA wood glue and requires less clamping, but almost always requires sanding off the excess that foams out of the joint. Elmer's make a good knockoff product called Ultimate Glue that's a little cheaper.
eFaucets.com: Great selection of material in-stock and best prices I've found on the internet. I purchased my American Standard faucets from them when my search for a local distributor came up empty. Since when did American Standard products become hard to find?
A & M Sandblasting: Have metalwork such as A/C grilles or electrical panel covers that are too expensive to replace, but are rusty and/or moldy? Get 'em sandblasted and repaint them yourself. A & M Sandblasting is in Chatsworth and their prices are a steal. They powdercoat too.
Linoleum City: Of course they're who to go to for linoleum in Los Angeles, but they also have a large selection of resilient flooring (VCT, vinyl sheet, FritzTile, rubber), cork, hardwood, laminate, ceramic tile and carpet. Staff is beyond knowledgeable about their products, which is a real plus.
Some of the things we do to our homes are just plain idiotic. This condominium has more than its fair share of those.
 This recessed light was installed in the A/C ducting soffit in the dining room. The installer pushed too hard with the hole saw and drilled a hole in the A/C duct the exact diameter of the recessed fixture. It was then discovered fixture's can would not clear the ducting, so it was discarded. Duct tape was fashioned to create a fire barrier and the fixture was glued into the drywall void with a hot-glue-gun.
 In order to supply an added alarm system with power, a previous homeowner tapped into this outlet. To patch the hole created, they merely wadded up butcher paper, stuffed it next to the outlet and plastered over. I'm amazed this place never burnt down.
The homeowner's association board of directors meeting occurred on May 14th of 2009. A full twenty days after I closed escrow. I attended the meeting and still did not receive a verdict on whether my plans for renovations are acceptable or not. I was told I would have a verdict by Monday, May 18th. However, I was advised that my choices for flooring materials are not strictly limited as long as I install an acoustic underlayment to accommodate the homeowner beneath me and to abide by the State of California building code which requires the floors of multi-story apartment and condominium buildings to achieve an IIC (impact insulation class) rating of at least fifty. This squashes my plans for polished concrete floors. The board mentioned at least one homeowner in the building has polished concrete floors and lives above other homeowners, but apparently the underlayment requirement applies to me and not him. I'm disappointed because polished concrete floors would've been an economical choice that would've provided great resale value due to its popularity. My goal for flooring is a material used consistently throughout the entire unit, including the kitchen and bathroom, with no variation and no thresholds. I refuse to install carpet. To me, ceramic tile is completely played out and I despise grout. Hardwood or laminate flooring is attractive, but not advisable for installation in kitchens and bathrooms. The look of natural stone such as marble or honed slate is too opulent for this application. The performance of vinyl sheet flooring is impressive, but almost all vinyl sheet attempts to mimic either ceramic tile, slate tile or hardwood...which I don't want. An exception to this rule is the vinyl flooring from Lonseal, especially their Lonnova UV. I've seen this stuff in person and it's amazing. Mirror-like gloss and metallic, but upwards of $6 per-square-foot uninstalled and I'm not paying that for vinyl flooring. Vinyl composite tile, or VCT, is a great economical choice (around $0.90 per-square-foot uninstalled) that's certainly authentic for the mid-century-modern home. My opinion is that AzRock makes the most attractive VCT. While poured terrazzo flooring is out-of-reach for most homeowners (upwards of $60 per-square-foot installed), FritzTile offers an affordable solution (around $5 per-square-foot uninstalled). FritzTile is terrazzo in tile form, but to be honest, I don't really like terrazzo.
Despite my admiration for VCT and the desire for the cost savings it provides, I don't want a tile product even if it doesn't require grout. I don't like the grid lines. If I didn't have the money for another product, I'd be happy with VCT even with the increased maintenance requirements (annual sealing, polishing, buffing, etc). But I can spend more, so I choose natural sheet linoleum.
To be honest, linoleum was always MY first choice due to it being soft and warm underfoot unlike concrete, but linoleum isn't exactly cheap and concrete would've provided better resale value. Linoleum is still pretty stigmatized because of the drab appearance of past products and the maintenance it required versus vinyl sheet flooring, which eventually caused linoleum's extinction in the 1970's. Nowadays many people refer to linoleum and vinyl sheet flooring interchangeably, but they're very different. Linoleum has recently made a comeback and it's more attractive than it ever was due to innovative manufacturers like Forbo. Armstrong recently resumed production of linoleum after abandoning it in 1974, but Armstrong's products seem to be geared more towards commercial installations and the availability of their product is scarce compared to Forbo's linoleum product titled Marmoleum.
Linoleum will provide a homogenous appearance like concrete, yet it's more durable (the concrete itself is durable, but even simple masking-tape will lift off the concrete's sealant) and it's more comfortable to walk on. Chances are linoleum will be more attractive too, because I doubt the cracked, splotchy, gypsum light concrete subfloor could ever be stained or polished into a presentable material. The product I've chosen is Forbo's Marmoleum. One of the many great things about living in a big city is the variety of goods and services available. Despite its resurgence, linoleum in residences is still pretty obscure and who would've thought there would be a linoleum distributor a couple of blocks away, then alone one named Linoleum City? I love Los Angeles.
 Above are several choices of Marmoleum. #2 is my favorite, but I cannot use it because it's a strange color. It's called "Papyrus White," but it's not really white or gray and it's not really ivory or tan either. It's got a slight green tint to it and it doesn't jive well with anything white. If I was planning on painting the walls a light grayish-green, this would be my choice...but I'm not. #6 would be my second choice, as it closely resembles used, beaten concrete, but it's a little dark and too olive green for my tastes. It's very nice though. #4 is actually called "Concrete" and it does resemble a clean, freshly poured slab, but there's something about it that I don't like. I think it's the gray with the ivory marbling. It just seems like the marble vein should be the darkest color present. #1 is too yellow, #3 is too baby-blue and #5 is too orange.
May 6th of 2009, 11 days after the close of escrow and still no word from the homeowner's association about my renovation plans. I took the initiative to bring in a structural engineer to give me a verdict on whether the two walls I want to remove are load-bearing or not. The homeowner's association cannot provide any structural plans. The first wall is in the foyer, blocks a window, and creates a dark, depressing entry when the rest of the unit is filled with natural light. The second wall separates the kitchen from the dining room. I would prefer an open kitchen and so would a large majority of potential buyers upon resale. I don't know if people want to show off their kitchens more than they used to or if cooking has become more of a social activity than it has been in the past, but no one wants closed off kitchens anymore.
 Unfortunately, the wall between the kitchen and dining room is load-bearing and cannot be removed. Even if the homeowner's association would permit me to transfer the load with a beam and columns (which they won't), the price tag of anywhere from $8,000 to $15,000 to do so, makes such an endeavor cost-prohibitive. If I would've known this wall was unalterable, I wouldn't have bought this place, or at least I would've drastically reduced my offer. Well, at least the foyer wall is not load-bearing and can be removed. Thanks to Gerald Joo, P.E. at Solid Structural Engineering for the prompt and affordable structural consult.
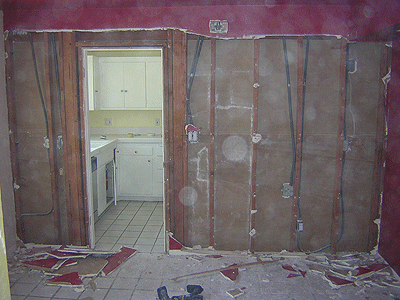 Load-bearing wall separating dining room from kitchen.
 Partition wall in the foyer with embedded circuit-breaker panel and low-voltage HVAC relay panel. Notice the plumbing and electrical conduit on the left. This portion of the wall will remain.
On April 24th of 2009, after 57 days in escrow, I finally became the owner of the 1970's porno condo. Escrow was extended twice without a per diem. Once, because my lender did not want to fund the property without the homeowner's association waiving their right of first refusal in case of foreclosure and secondly, because the seller's choice of services saddled me with an escrow and title company so slow that they took a week to close AFTER I signed all loan documents. In any case, the transaction is over and I can begin the next battle which is petitioning the homeowner's association for permission to gut the condo, remove the influences from the 1980's and revert the condo to a mid-century design that will more accurately reflect the building's original intent. However, this is not an entirely honest statement, i.e. the building's original intent was never to mimic the work of Charles and Ray Eames, Ludwig Mies Van Der Rohe or Cliff May, but the building was constructed in 1965 and I'd rather create the illusion of authenticity, and ape the mid-century-modern aesthetic, then leave the unit looking like a salvaged set from "Miami Vice." I have exactly 60 days to accomplish this task before I must move in and vacate my apartment rental. I do plan on moving in without the kitchen completed because the lead-time on cabinets is too great.
 The first thing I tackled once escrow had closed (actually the day before the title was recorded) was to remove all door casing and strip/sand all the door jambs. Sloppy, runny paint-jobs and too many coats of paint are a real pet-peeve of mine. Since this unit had 15 years worth of apartment tenants before 29 years of condominium owners, you can imagine the amount of paint on every surface within reach. Multiple coats of paint upon drywall is of little concern, but once door jambs and other high traffic areas are coated too thick, you'll never get a subsequent coat to stick unless you sand off a couple of layers. Problem is, latex paint will flake off and gum up your sander...if you don't want to change sandpaper every 5 minutes, use a chemical stripper and scrape until you reach bare wood. It's a miserable, tedious task, but better than repainting every year.

Below is a collection of condo interior images from various MLS listings. Despite the avocado-green carpet and textured linen closet doors, you'll notice most of the unit has been stripped of it's 1970's porno vibe and alternatively infected with the decade that gave us leg-warmers. So, if I learned anything from the SATs, it's that Linda Lovelace is to the building's common areas what Traci Lords is to the condo itself.
 Foyer with glass block partition. Is that Harold Faltermeyer music I hear?
 Wetbar with drywall soffit configured in 1980's geometric fashion. Ugh.
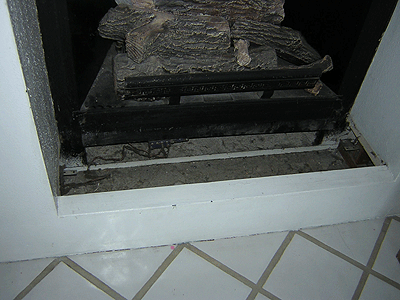
 Living Room. Notice the vent above the fireplace near the ceiling. A previous owner compromised the fire barrier surrounding the flue with the intention of recirculating heat back into the unit. It does do that, but it also disperses soot all over the ceiling. Nice.
 Living Room. The counter of the wetbar is on the right.
 Close-up of fireplace surround made out of plywood and drywall. Because combustible materials should be placed right next to fire. To top it off, there's also recessed lighting fixtures mounted inside the fireplace surround. Why didn't they finish it off by painting it with Sterno?
 Kitchen.
 Kitchen. There used to be a cooktop with cabinetry underneath where the freestanding range currently resides. It was removed and the cabinets bisected to accommodate the range because the wall ovens were removed to add a washer/dryer combination unit.
 Close-up of the washer/dryer unit installed in the void where the wall ovens used to be. Notice the gaping hole above the washer/dryer and the surface mounted waste and supply lines running behind the refrigerator space. Consequently, this would prohibit the refrigerator from being placed against the wall.
 Dining room.
 Close-up of hideous ceramic tile with 1" lines of what was once white grout.
 Bedroom. The avocado-green carpet might be original. Unfortunately, the closet doors didn't fare so well. Oh well, closet doors are overrated anyway, who needs 'em?
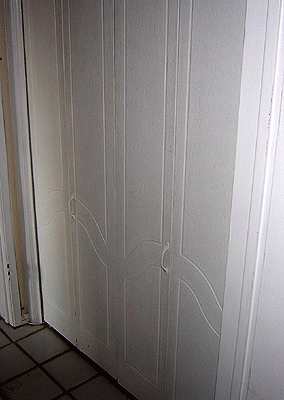 I don't have closet doors in the bedroom, but I do have these wicked fancy, textured doors on the linen closet. Yeah, I've got sheet metal doors that were shrouded in burlap and then coated with white enamel paint...Jealous?
 Bathroom. Excluding the frightening wallpaper border, the bathroom is surprisingly decent.
 Bathroom. The jalousie window in the shower originally had dark brown glass. Yikes.
 I am purchasing this condo from the bank who foreclosed upon the previous owner. The pictures above and below are from the MLS listing of the seller who sold the unit to the eventually foreclosed upon previous owner. This sale (the last prior to foreclosure) was for $391,000 in 2006. I cannot believe this dump sold for that amount...especially like this? Wow.


 The first fixture I knew was going in was this reproduction sputnik light I'd purchased years prior from Practical Props, a dealer/manufacturer in North Hollywood that largely rents period lighting fixtures to film and television productions.
 What I had not intended was for Practical Props to custom design some sputnik sconces for my foyer and outside my bedroom door (seen below). I'd initially intended to use some brushed aluminium "double cone" or "bowtie" sconces, but these sconces protruded too far from the wall and would prove problematic near a doorway. The sputnik sconces were the most flush, mid-century appropriate fixtures I could find and Practical Props customized the length of the "tentacles" to the low heights of my ceilings...and all this for less than the cone sconces.
 Sconce outside bedroom / bathroom doorway. Even at a relatively flush six-and-a-half inches, this fixture still is frequently disturbed and prodded by passing shoulders and arms.
 I'd always wanted a George Nelson saucer lamp. This "criss-cross" model is in the dining room.
 If you recall from my post entitled "Idiots," I needed to solve a problem created by recessed lighting installed without cans or any fire-barrier into an A/C ducting soffit. These lighting fixtures called "Beauty Spots" by WAC Lighting were a good solution. They're technically recessed fixtures as the housings are not visible, yet the bulb is not recessed and instead is covered with a flush-mount, glass cube for decorative purposes. With these fixtures, I can utilize the space for lighting without worrying the heat of a light bulb will ignite the ducting insulation.
 Close-up of "ice cube" attachment around 20 watt, xenon bulb.
 View of dining room from the living room showing the sputnik light above the wetbar on the left, the sputnik sconce in the foyer, the Nelson saucer lamp in the dining room and the beauty spots on the far right.
 I found this fixture at the Habitat-for-Humanity ReStore in Pasedena. It was painted black, had several drips of white exterior paint on it, a broken porcelain socket and badly rusted brass hardware. I'd always intended for a chrome "bullet" fixture to be installed above the stone veneered fireplace, but I assumed I'd pay $225 for an "Aloha" fixture from Rejuvenation. I ended up spending $5 for this fixture at the ReStore, an additional $5 in rewiring supplies from Home Depot and $25 to have the fixture stripped and polished by Astro Chrome and Polishing. I painted the brass hardware with a can of matte silver spray paint I already had. Not bad for a total cost of around $35.